

While this is week 2 of the One Room Challenge, it’s actually week four for me – and week three was a dud week as I was traveling for work and for a wedding. Because I knew I was traveling last week, and still wanted to participate in the One Room Challenge, I got started a couple of weeks earlier than all of the other participants. Now that I took a week off, we’re all at the same place in our projects!
If you missed out on the first week of the One Room Challenge, you can read about it here.
As I look back on the first week, here’s what I’ve learned about DIY-ing your own space:
The demo part is HARD work
Like really, really hard. The first week I worked on this project was all demo. I took down a wall, part of the ceiling, some walls, and ripped up floorboards.
At the end of every day, there was something in my body that was pulled or tweaked that wasn’t supposed to be.
By the end of the week, I could barely walk.
It was 7 days in this position that did me in:
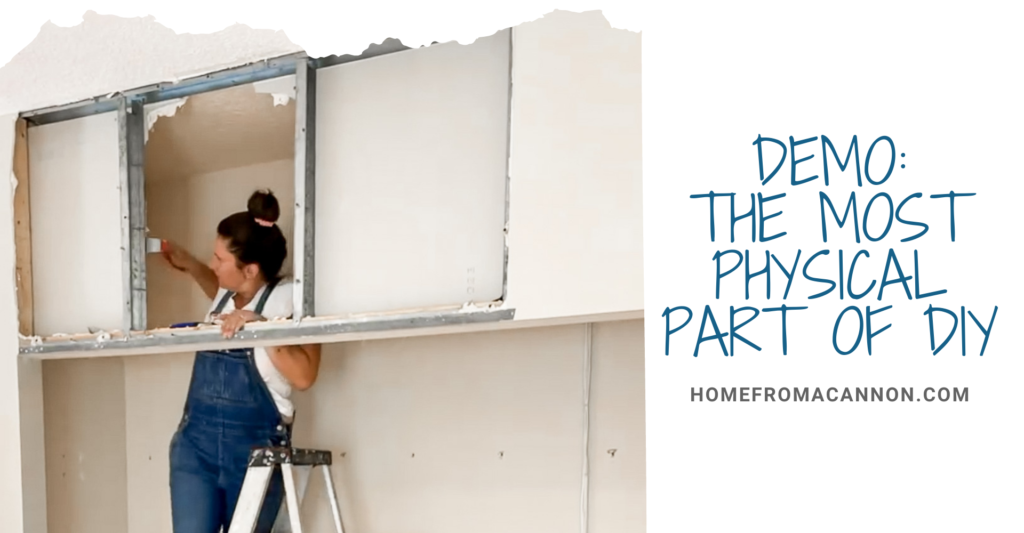
I severely underestimated the time, energy, and physical strength that goes into demo work in the house. Though, in the demo’s defense, it’s also incredibly satisfying to swing a hammer at a wall, especially when you’ve had a tough day.
Preparation is 90% of the project
I’ve shared before, but my biggest strength (and in rare cases, weakness) is I default to action. As soon as I understand *some* of the process, and a rough idea of what needs to be done in what order, I just go. I’m NOT a detail person. Never have been, will probably never be one.
I just go.
This is a GREAT trait if you’re working on a small team or a project that doesn’t require a lot of fine details. It makes me especially valuable in corporate consulting because I have a strong sense of urgency to just get started (which is the opposite of literally everyone else who works in corporate America).
Where it’s not so fun is in DIY, where details are IMPORTANT. I eventually get there but had I spent an extra few hours at home researching and coming up with a plan and maybe writing it down, I probably would have saved myself roughly 10 trips to the hardware store.
While the preparation is annoying, the biggest thing I’ve learned so far is to slow down before you hurry up.
What differentiates a “bad” DIY from a “good” one is only three products
Yep, you heard me right. Three products are all you need to take your DIY project from “OMG, WHY?!” to, “so pretty!”
What are they? Wood filler, caulk, and joint compound.
It’s absolutely amazing what these three products can “hide.” From botched drywall measuring, to “janky” boards, and nail or screw holes, these three products can ABSOLUTELY change your DIY game.
Here I am applying some wood filler to the boards that I bought before I hung them on the wall. I put this into some of the cracks and knots that are found on the wood naturally. I also added wood filler to the nail holes after I put this up on the wall.

The caulk I used to cover up seams between two materials. The joint compound fixed my janky drywall situation on my ceiling.
Go buy twelve of each of them. Right now.
Go.
It’s good to have a vision, but be prepared to change it
Like I said earlier, I’m not a planner. But I definitely had a vision for the room when I started. I did spend hours looking at inspiration and building a mood board hundreds of times until I had refined what I was looking for. I measured, remeasured, and remeasured 300 more times.
But then things are out of stock, furniture takes longer than you anticipate and you have to cancel your orders and find something new, the thing you thought existed doesn’t actually exist.
Whatever happens, your plan WILL change. And you need to be prepared and able to flex with your constantly changing plan.
This may mean extra trips to the store. It may also mean the thing you were totally set on won’t work and you’ll have to find an alternative.
This is all part of the process of DIY – and, from what I’ve learned, is what can lead to some amazing ideas.
And probably a few tears.